Create Your Planner From A Printable Design
This blog post explains one way you can approach creating your planner from a Secretly Scrapbooking Printable Design. This article presumes that you have all the appropriate essential elements including a printer, a trimmer / guillotine and sufficient paper.
Test Page Printing
Secretly Scrapbooking printable designs are provided in the PDF format and are typically configured for printing using standard A4 paper. You should download the appropriate Test Print Page to allow you to confirm how to flip your paper to do double sided printing and also to check alignment when manually double sided printing. You should ensure that clean sacrificial paper is loaded into your printer such as regaular printer paper with at least 4 pages available as it can sometimes take a few attempts to align the pages.
This example presumes you are using Adobe Acrobat Reader DC to open the printable design. Proceed to print and you should be presented with the following prompt:
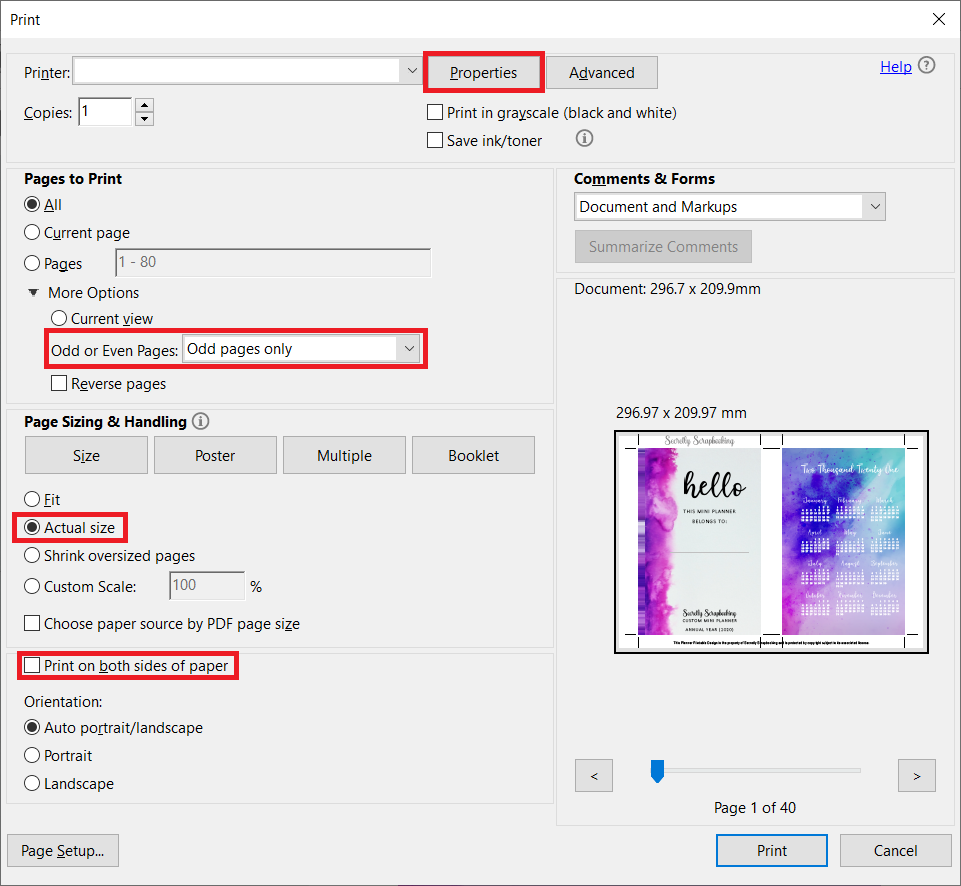
First ensure that the Page Size & Handling "Actual Size" setting is set and "Print on both sides of paper" is unchecked. Next select Properties and ensure that your printer is configured for a standard quality print if this is an option, this will vary from printer to printer so this cannot be shown. You should ensure that Pages To Print is set to Odd Pages Only to print the front page. Once printed flip the page / reinsert the page into the tray the way you think it should be done and change the Pages To Print is set to Even Pages Only to print the back page. Assuming this has printed front and back so that the page text is on opposite side and facing the same way up. Explained another way, with the page "Front" facing you and the text "Top" at the top, flip the page on the short edge or left to right and the text on the back should be facing the same way once the page is flipped. You can now confirm alignment which requires you to hold the page up to the light and the crop lines and lines on the page edges should align / be hidden by the lines on the front.
If the pages are out of alignment then this requires you to investigate alignment options which may or may not exist for your printer. Often these settings only apply to the print session and must be configured every time you need to print, also it is possible to approach this by adjusting only one side but I prefer to make it so that both pages are adjusted as this allows me to save it as a print profile on my printer. Once you are confortable with you print alignment settings and how they work you should take notes about your ideal configuration so you can refer back to them.
Printable Design Printing
Open your Secretly Scrapbooking printable design PDF and ensure the correct A4 paper is loaded for the final product. You should ensure that the appropriate paper is loaded into your printer with a sufficient quantity to print the total number of pages in the PDF divided by two (2) as you will be printing the designs double sided, this is approximately 80 pages total or 40 A4 pages. You should adjust Printer Properties to ensure printing is set to High print quality and alignment settings are set appropriately. Confirm the following before printing:
- Page Size & Handling set to "Actual Size"
- "Print on both sides of paper" is unchecked
- Pages To Print set to Odd Pages Only
Once this print session is completed, flip the pages in line with your Test Page Print.
Confirm the following before printing:
- Page Size & Handling set to "Actual Size"
- "Print on both sides of paper" is unchecked
- Pages To Print set to Even Pages Only
Once completed printing is now complete.
Trim And Punch
Assuming you have successfully printed off your printable design you must now trim the end product to size. You will notice on my printable designs have what is called crop lines which are horizontal and vertical lines which are designed to show you where the page edges are which should allow you to cut straighter and at the correct locations. This is a combination of black lines away from the page edges and grey corner marking on pages that don't have colour on the page to demarc page edges. It is recommended that you cut in a consistent way so that any characteristics of your printer or trimmer are maintained for all pages such as all facing the same way up and cutting in the same edge sequence. Before cutting any pages, confirm that all pages have sufficient markings to cut in the sequence you intend to use. For minimum cuts it is suggested that you cut both long edges and then all short edges if this will work. Once you pages have been trimmed they should be stacked and confirm that the pages are the correct size and do not require further trimming.
Once all pages have been trimmed appropriately, you can now stack and confirm all pages are in the correct order and oriented so that all margins are on the correct side. Remember, confirm twice...punch once because reprinting and trimming is a mission. Align and punch your pages ready to be add to your planner!
Congratulations on your new planner!!!
I hope this guide helped you in creating your planner and I welcome any feedback or information that could help people in future. As always I am happy to chat with you about your needs so if you find yourself needing more information about the products on my store or custom made needs I am only a message or email away. Hopefully you enjoy my online store and what it has to offer and, as mentioned previously, any feedback is always appreciated. Thanks for reading my post and please feel free to leave me a comment. Now it's time for me to go back to Secretly Scrapbooking.
Stella Xx
Bunbury, WA
Shop | Custom Orders | Candle Product List | Secretly Scrapbooking Facebook
Outbound Links:
Read Prev Post